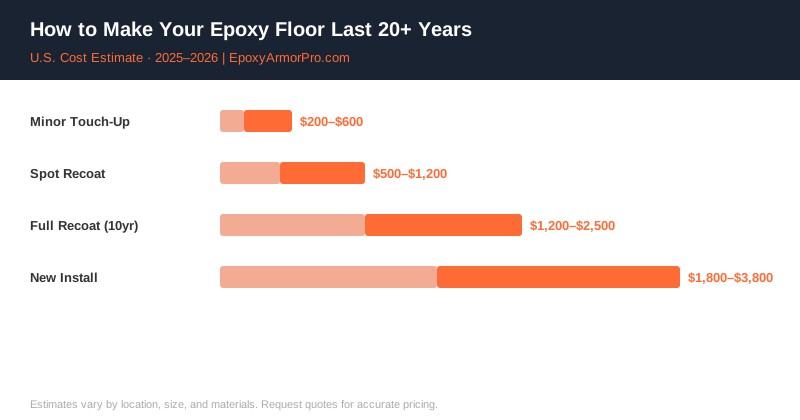
A professionally installed epoxy floor system, properly maintained, can last 20 years or more. That’s the data point most contractors cite — and the floors that make it that long share one thing in common: their owners actually know what maintains them and what destroys them. The floors that fail in 5 years? Almost always neglect or specific avoidable damage, not a product defect.
Here’s how to be in the first group.
Your Routine Cleaning Schedule
Epoxy is genuinely low-maintenance compared to bare concrete. But “low maintenance” doesn’t mean “no maintenance.” Here’s what a sensible schedule looks like:
Weekly (or after heavy use):
- Sweep or dust mop to remove grit, dirt, and debris. Fine particles act like sandpaper underfoot and underwheel over thousands of repetitions — they’re the #1 source of surface dulling over time.
- Spot-clean any drips or spills immediately (more on which ones matter below).
Monthly:
- Mop with a pH-neutral cleaner diluted in warm water. Simple Green, diluted Dawn dish soap, or a product specifically formulated for epoxy floors all work well.
- Rinse with clean water and let it air dry — or use a squeegee to move standing water to the floor drain.
Annually:
- Inspect the surface under good lighting for any signs of wear in high-traffic zones (in front of the door, under tire contact patches).
- Check edges and transitions where the epoxy meets walls or door thresholds — those spots see the most mechanical stress.
What Actually Damages Epoxy (The Specific Culprits)
Hot Tire Pickup
This is the most misunderstood failure mode. When you drive home in summer and pull into the garage immediately, your tires are hot — we’re talking 150–200°F surface temperature after highway driving. Hot tires can soften standard epoxy coatings enough to bond slightly to the surface, and when you pull out again, they take little chunks with them.
Hot tire pickup is dramatically reduced or eliminated by:
- Using a polyaspartic topcoat (rated to 200°F vs. ~140°F for standard epoxy)
- Letting the car cool for 30–60 minutes before pulling in during peak summer heat
- Using interlocking floor tiles under the tire contact patches as a simple protective layer
Sharp Impacts
A metal tool, the corner of a jack stand, or a dropped wrench can chip epoxy. It’s not going to shatter the floor, but point impacts from hard metallic objects leave small chips that, over time, accumulate into visible wear patterns. Use rubber mats or foam under equipment you’re going to be working around.
Specific Chemicals
According to data from the Epoxy Technology Association, the following chemicals cause measurable damage to standard epoxy systems with prolonged contact:
- Concentrated battery acid (sulfuric acid) — immediate damage if left pooled
- Methylene chloride (found in some paint strippers) — attacks the binder directly
- Skydrol hydraulic fluid (aviation-grade) — very aggressive
- Extended contact with motor oil (minor surface dulling, not structural, but wipe it up)
Casual contact with most automotive fluids — coolant, brake fluid, transmission fluid — is fine if cleaned up within a few hours. Don’t leave anything pooled overnight.
Standing Water and Salt
In cold climates, road salt gets tracked in with snow and melt. Salt itself doesn’t attack cured epoxy, but it leaves a residue that looks terrible and can pit the topcoat surface over years. After winter months, a thorough mopping is worth doing.
Standing water at floor transitions or in front of garage doors can work its way under the coating edge if there’s any delamination starting. Keep drains clear and squeegee standing water away after washing.
Seasonal Maintenance: Cold-Climate Tips
If you’re in a climate with hard winters, pay extra attention to these:
- Fall — do your annual inspection before winter. Touch up any small chips before they become water infiltration points.
- Winter — avoid using metal snow shovels directly on the epoxy. Use a rubber-edged blade or plastic shovel if you’re clearing ice near the door.
- Spring — thorough wash to remove all salt residue. This is the one mop-down that actually matters most in cold climates.
- Summer — the hot tire season. If you don’t have a polyaspartic topcoat, the cooling window before pulling in matters most now.
Signs You Need a Touch-Up vs. a Full Recoat
Touch-up (spot repair) is appropriate when:
- You have isolated chips from impact damage — no more than a few square inches
- A seam or transition edge has lifted slightly
- You have a small area of delamination that hasn’t spread
Touch-ups involve grinding the damaged area lightly, feathering the edges, and applying fresh material to that section. A good contractor can blend them reasonably well, though they’ll rarely be invisible.
Full recoat is the right call when:
- Wear is widespread across high-traffic zones, not isolated
- The topcoat has gone from glossy to hazy or matte across large areas
- You’re seeing widespread fine cracking (crazing) in the topcoat
- The floor is 15+ years old and looking generally tired
A recoat — applying a new topcoat over the existing system after light sanding — is significantly less expensive than a full new install because the prep work is minimal. Expect to pay roughly 40–60% of the original install cost.
For more on the original investment you’re protecting, see our complete garage epoxy guide and our breakdown of what affects epoxy installation costs.
Contractor Referral Disclaimer: EpoxyArmorPro is a contractor referral and cost information service, not a licensed flooring contractor. We connect consumers with independent, licensed, and insured contractors. We do not perform any flooring work directly. Cost estimates are averages based on market data and vary by location, project size, materials, and contractor. Always verify contractor licensing and insurance before hiring. Individual quotes may differ from estimates shown.