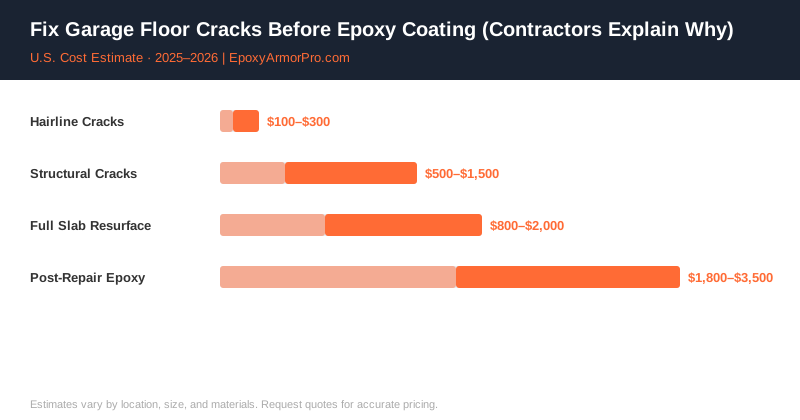
Mark had just spent $2,800 on a professional-grade epoxy floor for his two-car garage. Twelve months later, the coating was cracking along the same lines where the concrete had cracked before the install. His contractor had filled the cracks with a standard filler — but hadn’t assessed whether they were structural. The floor looked great for about a season. Then it didn’t.
That scenario plays out constantly. And it’s almost always preventable.
Why Crack Repair Isn’t Optional
Here’s the thing: epoxy bonds to concrete, not air. When there’s movement in a crack — even micro-movement from seasonal temperature changes — the coating on top of it will eventually follow. Concrete expands in summer heat and contracts in winter cold. If the crack beneath the coating is still active (meaning the two sides move independently), the coating will crack too.
The Concrete Network estimates that improper surface preparation — including skipped or inadequate crack repair — accounts for the majority of premature epoxy delamination and failure cases. Spending $50 on the right filler before coating saves you from a full recoat job down the road.
Identifying What Type of Crack You’re Dealing With
Not all cracks are the same, and the repair method depends on the type. Here’s how to read them:
Shrinkage Cracks
These are the most common cracks in residential garage slabs. They form while the concrete is curing — typically within the first few years after the pour. They’re usually narrow (under 1/8 inch), relatively shallow, and don’t follow any structural pattern. They don’t indicate a problem with the slab’s load-bearing capacity.
What to look for: Random spider-web pattern, or straight cracks that don’t correspond to any obvious load or joint.
Settlement Cracks
Settlement cracks happen when the soil beneath the slab compresses or shifts unevenly. One side of the crack is often slightly higher than the other — that’s the key tell.
What to look for: One edge of the crack is elevated. If you run your finger across it, you feel a step.
Structural Cracks
These are the cracks that should get a professional eye before you coat anything. They’re typically wider than 1/4 inch, often accompanied by significant displacement, and may grow over time.
What to look for: Widening over weeks/months, major displacement between the two faces, or cracks that run diagonally from corners of doorways or windows.
How Contractors Repair Cracks (The Right Way)
For Hairline and Shrinkage Cracks
- Grind the crack open slightly — a crack saw or angle grinder with a diamond blade widens the crack to a consistent “V” profile. This creates more surface area for the filler to bond to and removes any dust or loose edges.
- Vacuum out all dust and debris — compressed air and a shop vac. Any contamination in the crack prevents adhesion.
- Apply semi-rigid polyurea filler — not epoxy, not concrete patch. Polyurea has slight flexibility that lets it move with the concrete through seasonal cycles without cracking itself.
- Overfill slightly, then grind flush — once cured (typically 15–30 minutes for fast-set polyurea), grind the repair flush with the surrounding slab.
For Settlement Cracks with Displacement
- Assess whether the displacement is still active — mark both edges of the crack with pencil and check in 30 days. If the marks shift, the movement is ongoing.
- Grind down any raised edges — a handheld grinder can feather out a lip of up to about 1/4 inch. Larger displacement may need a floor grinder.
- Fill with flexible polyurea — same process as above, but use a deeper fill for wider cracks.
- Install a saw-cut control joint over it — some contractors cut a clean control joint directly over a settlement crack after filling it. This deliberately gives the concrete a place to move without cracking the coating.
For Structural Cracks
Stop. Don’t coat. Get a structural assessment first.
A crack that’s actively widening or has significant vertical displacement is telling you something about what’s happening under the slab. Coating over it is cosmetic at best and deceptive at worst if you’re planning to sell. Fix the underlying drainage or soil issue first.
What Pros Use That DIYers Usually Skip
Professional contractors almost universally use polyurea crack filler rather than the cement-based patching compounds sold at hardware stores. Polyurea bonds to concrete aggressively, cures in minutes rather than hours, and has the slight flexibility that prevents re-cracking. Brands like Rhino Linings, Surecrete, and Metzger/McGuire make the commercial-grade products.
For larger areas — spalled sections, pitting, or aggregate exposure — contractors use a cementitious or epoxy mortar to rebuild the surface profile before the coating goes down.
According to the Portland Cement Association, concrete expansion and contraction can be as much as 0.5 mm per meter for every 10°C temperature change. For a 20-foot garage slab, that’s real movement. Your repair material needs to handle it.
What to Ask Your Contractor Before They Start Coating
- Are you grinding the cracks open before filling them?
- What filler product are you using — is it polyurea?
- Are you grinding repairs flush before the base coat goes down?
- Is there any displacement in the cracks, and if so, what’s the plan?
- Are any of these cracks structural in your assessment?
For more on what happens after the cracks are repaired, see our complete garage epoxy flooring guide and our breakdown of what affects epoxy installation costs.
Contractor Referral Disclaimer: EpoxyArmorPro is a contractor referral and cost information service, not a licensed flooring contractor. We connect consumers with independent, licensed, and insured contractors. We do not perform any flooring work directly. Cost estimates are averages based on market data and vary by location, project size, materials, and contractor. Always verify contractor licensing and insurance before hiring. Individual quotes may differ from estimates shown.